Search  for anything...

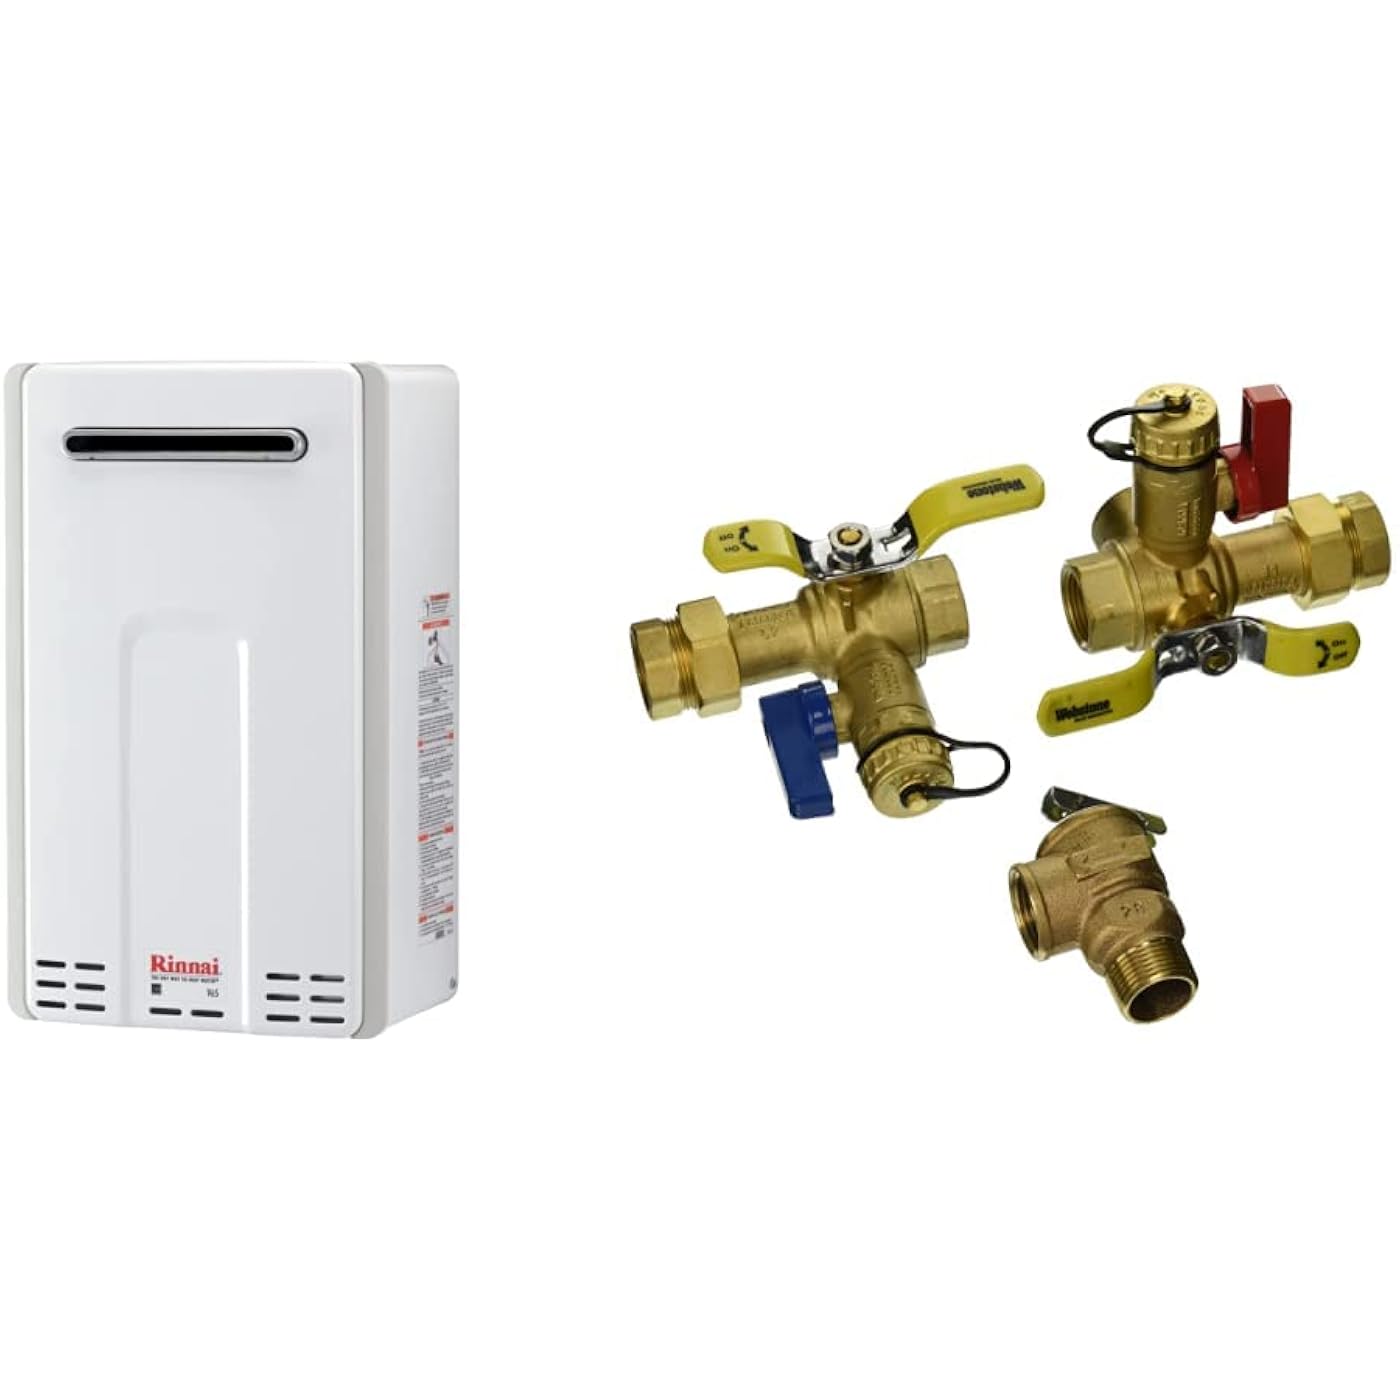
Rinnai V65eP Non-Condensing Propane Tankless Water Heater, Outdoor Installation, Up to 6.5 GPM & 3/4 IPS LF EXP E2 With PRV Tankles

  • Based on 2,471 reviews
Condition: New
Checking for product changes
$911.23 Why this price?

Buy Now, Pay Later


As low as / mo
  • – Up to 36-month term with PayTomorrow
  • – No impact on credit
  • – Instant approval decision
  • – Secure and straightforward checkout

Ready to go? Add this product to your cart and select a plan during checkout. Payment plans are offered through our trusted finance partners Klarna, PayTomorrow, Affirm, Afterpay, Apple Pay, and PayPal. No-credit-needed leasing options through Acima may also be available at checkout.

Learn more about financing & leasing here.

Selected Option

Free shipping on this product

This item is eligible for return within 30 days of receipt

To qualify for a full refund, items must be returned in their original, unused condition. If an item is returned in a used, damaged, or materially different state, you may be granted a partial refund.

To initiate a return, please visit our Returns Center.

View our full returns policy here.


Availability: 14 left in stock
Fulfilled by Amazon

Arrives Tuesday, Nov 26
Order within 6 hours and 38 minutes
Available payment plans shown during checkout

Size: 6.5 GPM


Style: Propane, Outdoor Installation


Pattern Name: Heater + IPS LF EXP E2 With PRV Tankles


Features

  • Product 1: Original Design: Tankless hot water heater only heats when necessary to conserve energy; For the latest in non-condensing technology and a cleaner layout that speeds up service and installation, check out our new RE160eP model
  • Product 1: Never Run Out of Hot Water with this Compact Propane Water Heater: Non-condensing tankless hot water heater from Rinnai is only the size of a small suitcase and fits in a wide variety of spaces, but provides up to 6.5 GPM (5 fixtures at once)
  • Product 1: Smart, Durable Design: Enhanced scale detection helps prevent serious, long-term damage to unit; Includes 15-, 5-, and 1-year residential guarantee for heat exchanger, labor, and parts, respectively; See Controlr module for WiFi control (not included)
  • Product 1: Professional Installation Recommended: Visit the Find a Rinnai PRO page on our website to locate a qualified technician in your area to install your tankless water heater; We do not recommend installing a water heater without a technician
  • Product 2: Lead Free - Meets all federal & state standards for lead levels in drinking water system components.
  • Product 2: Size is 3/4in
  • Product 2: Tankless Water Heater Service Valves
  • Product 2: 1 per carton - 10 per case - Individually Priced & Sold

Description

Rinnai V65eP Non-Condensing Propane Tankless Water Heater, Outdoor Installation, Up to 6.5 GPMRinnai's high-efficiency non-condensing outdoor tankless water heater models offer advanced technology for your home with comfort and value. Designed to be extremely compact, this small water heater only takes up the space of a small suitcase, letting you reclaim some of your home's most valuable real estate. This smart on-demand hot water heater can be made even smarter with a Rinnai Controlr for WiFi connectivity (not included). This easy-to-install, ultra-compact unit lets you enjoy all the benefits of Rinnai tankless water heating. You'll experience clean, reliable hot water at a consistent pre-set temperature, while saving energy and precious floor space in your home.Rinnai's V65E exterior-mount tankless water heater efficiently delivers up to 6.6-Gallon per minute (GPM) of hot water, making it perfect for your one to two and half bathroom home. This easy-to-install, ultra-compact unit lets you enjoy all the benefits of Rinnai tankless water heating. You'll experience clean, reliable hot water at a consistent pre-set temperature, while saving energy and precious floor space in your home.3/4 IPS LF EXP E2 With PRV Tankles3/4 IPS LEAD FREE ISOLATOR EXP E2 w/LEAD FREE PRESSURE RELIEF VALVE TANKLESS WATER HEATER SERVICE VALVES - HOT & COLD SET - FULL PORT BRASS BALL VALVES w/ADJUSTABLE PACKING GLAND, HI-FLOW HOSE DRAINS (500 WOG) & PRESSURE RELIEF VALVE (150 PSI/200K BTU)Hot and cold set of full port forged brass ball valves with hi-flow hose drains and pressure relief valve outlet.


Brand: ‎Rinnai


Capacity: ‎6.6 Gallons


Power Source: ‎Natural Gas


Material: ‎Brass, Propane


Style: ‎Propane, Outdoor Installation


Maximum Operating Pressure: ‎150 Pound per Square Inch


Manufacturer: ‎Rinnai


Size: ‎6.5 GPM


Pattern: ‎Heater + IPS LF EXP E2 With PRV Tankles


Item Package Quantity: ‎1


Date First Available: November 8, 2022


Frequently asked questions

If you place your order now, the estimated arrival date for this product is: Tuesday, Nov 26

Yes, absolutely! You may return this product for a full refund within 30 days of receiving it.

To initiate a return, please visit our Returns Center.

View our full returns policy here.

  • Klarna Financing
  • Affirm Pay in 4
  • Affirm Financing
  • Afterpay Financing
  • PayTomorrow Financing
  • Financing through Apple Pay
Leasing options through Acima may also be available during checkout.

Learn more about financing & leasing here.

Top Amazon Reviews


  • Can I really install this DIY?
Size: 7.5 GPM Style: Natural Gas, Indoor Installation Pattern Name: Heater
Before you even try to answer the question of whether or not you can install this yourself, call your local city clerk and see if a permit is required to replace a water heater. If it is, then you're dead in the water before you even begin. You'll need it professionally installed. But if that's not the case... Things you need to know before purchasing: 1) Read the manual! Especially the section regarding gas line requirements. Depending on how far your water heater will be from the gas line point of entry, how many bends there are to get there, and the pressure supplied to your house, there is a chance that you will need to replace every bit of pipe between the meter and the water heater. 2) The gas inlet on the water heater is 3/4". Even if the rest of the pipe meets the specification, if you are putting this where a tank water heater used to be, the leg of pipe supplying it was probably 5/8" and will need to be replaced. 3) It requires an electrical outlet. It has an electronic ignition, and is controlled by a circuit board. It's basically a furnace that heats water instead of air. 4) You will NOT be able to use your existing tank water heater's vent pipe. You might be able to use the same hole in the roof (or wherever it exhausts to), but the pipe itself will have to be replaced. The replacement pipe is not cheap! Also, read the manual regarding pipe requirements. If it is so long or has so many bends, you will have to deal with condensate. Common questions regarding this particular line of water heaters: Q:) What is the difference between the Value series of Rinnai water heaters, and the Luxury series? A:) The Luxury series includes a built-in recirculation pump, and includes bypass valves. If you don't intend to use a recirculation pump, skip the Luxury model and purchase the bypass valves separately. Q:) So do I need a recirculation pump? A:) No one needs a recirculation pump. It is an add-on that gets hot water to your taps faster than you would be able to do so without one, but it is never a necessity. Q:) Should I get a mid-efficiency non-condensing or high-efficiency condensing tankless heater? A:) Unless you use a large amount of hot water, the efficiency gains you will realize with a condensing unit over a non-condensing unit are minimal. Condensing units are more complex, meaning more parts to worry about; they require both an inlet and and exhaust pipe (although there are adapters to combine them into a coaxial pipe); and you will be forced to deal with condensate, which is not a small task, as it is acidic. IMO unless you really have a need for that extra bit of efficiency, skip the condensing unit. Q:) Can really I run my own gas line? A:) Yes! Actually running the gas line was one of the easier tasks for me. You can purchase pre-threaded lengths of pipe from your local big-box hardware store, as well as the "pipe dope" sealant. Just make sure you plan your route beforehand, and draw it out so you'll know how many corner adapters and T adapters you'll need. Don't forget to include a trap. Usually if you find you need a section of pipe a certain length that isn't carried, you can build a pipe you need by coupling two other sizes together. I was able to complete the entire project without requiring any custom lengths of pipe. You'll definitely need at least two large pipe wrenches, however, and you'll want to learn how to properly check for leaks, of course! Q:) What was the hardest part of installing the water heater? A:) The exhaust pipe. In my case, I decided to avoid the hassle of trying to follow the existing vertical pipe, and used a 21" Rinnai kit to exhaust out the side of my house. If you have the option to exhaust out the side, this is going to be the cheapest and easiest way to go. BUT, you will have to make a 5.5 inch hole in the side of your house for the pipe to fit through. My house had thicker-than-average brick, so making that hole in the side of my house was like an entirely separate project. I ended up buying a 5.5 inch core drill bit (from Amazon) just for the task. So, with all of this in mind, what are some tips? Well, obviously read the manual first! But what else? 1) First off, if you are replacing a tank water heater, the first thing you should consider is, "Do I really need/want to put this tankless water heater where the existing water heater was?" Of course everyone's situation varies, but more often than not, you can save yourself a lot of headache and work by putting the tankless on an exterior wall or near an exterior wall, instead of trying to put it where the tank one was. Once you realize that you're not going to be able to use the existing tank heater's exhaust pipe or gas supply line, there's really no reason to keep it in the same place. In my particular case, I freed up a huge amount of space in my basement laundry/bath room by removing the tank heater and putting the tankless above my toilet. 2) Think about where you want to mount the heater, and determine if you'll need to build a mounting plate. In my case it worked out perfectly and I was able to screw the heater directly into a stud. But you may not be so lucky. 3) Look at where you plan to mount the heater, and think about where the exhaust will have to go. Then, read the manual, and make sure you can vent the exhaust while meeting all of the requirements regarding clearance to ground, clearance to another opening or window in the house, etc. 4) Look at the available exhaust kits and pipes and determine what you'll need beforehand, and take note of the cost. It's not cheap stuff. Also, keep in mind you may have to cut a piece of this special pipe, and there is a specific way it has to be cut. Check YouTube for the Rinnai Guy. So, can you really do this on your own? That really depends on you, and your mindset. For a lot of people, installing one of these might seem do-able at first, until they realize exactly how much will need to be done, then it may pretty quickly feel like they have bitten off more than they can chew. But if you are the type of DIYer that is confident in being able to rise to any task, then yes it can be done. ... show more
Reviewed in the United States 🇺🇸 on June 15, 2020 by S. Brewer S. Brewer

  • Very good unit. Tricky install. Need special vent pipes, not your old ones.
Size: 7.5 GPM Style: Propane, Indoor Installation Pattern Name: Heater
The piping that, in my case went up through the crawl space, then through the roof was tricky to install. Ordered all new pipe after measuring carefully and cataloging the fittings I'd need (45's, 90's, and so on). Make sure to order the right diameter double-walled pipe. Look online. I ordered online and the company actually shipped the same day, and it came the next, which is nice if, like me, you are without hot water in the interim. S. Brewer's review is excellent. He covers all the crucial points very well. He explains clearly what you will be faced with if you decide to DIY the job. It was challenging. When you get to the point of lifting the unit up to hang it on the wall while simultaneously marrying it to the vent pipe, a second set of hands would be a major plus. I did it myself, but a second set of hands would be real boon at that point. I was able to use the existing hole in the roof, but, as it turned out, the contractor who built the house preferred to cut a gigundo hole in the roof instead of doing the geometry to accurately predict the penetration location and hole size. To compensate, I created a plywood insert with a proper hole cut into it, pre-drilled the screw holes, and then used light cord to pull the "mask" up from above, up on the roof. Once I had it placed properly, I used a right-angle drill to drive in the screws from underneath. Don't forget that you'll need a flashing unit on the roof to make a good waterproof seal, and also some roofing tar to further seal it. Be careful when lifting the shingles to slip the flashing unit under them to avoid breaking them. If you do some minor damage to the surrounding shingles, use the roofing tar to compensate. Once installed, the unit works very nicely with the caveat that it does not seem possible to set the temperature above 120°F. That's really sufficient, but my old unit was set at 125°F. Not a deal breaker. If you've not had an on-demand heater before, be aware that when running hot water, there's a lag before you actually get hot water. With this unit about 20' from the kitchen sink, that's about 30-45 seconds before the water warms up. Overall, very happy to have hot water again, and this unit outperforms the previous, larger capacity unit it replaced. Install a phosphor filter upstream from the unit to reduce maintenance flushing. Do install the valve set that will later permit de-scaling the boiler tank. This is important for the longevity of the installation. TIP: use the woven steel, flexible pipes to connect the unit to gas, inlet, and outlet pipes. These are much easier to work with than their copper counterparts, which are hard to bend-- MUCH easier. Good luck. If you prepare well ahead of actually doing the job, you will greatly reduce the stress factor in carrying out the actual installation. Do your homework. YouTube is your friend. ... and DO read S. Brewer's excellently written and potentially very helpful exposition on the entire process of installing these units. p.s. If you need hot water in a hurry at your taps, you'll want to spend the extra spondoolix for the unit with a recirculating pump: it's a luxury, but if you prefer faster delivery of hot water to your taps, you'll want that version of the heater. Cheers, N. ... show more
Reviewed in the United States 🇺🇸 on November 12, 2022 by Netizen

  • Confusing install, no helpful tech support
Size: 6.5 GPM Style: Natural Gas, Indoor Installation Pattern Name: Heater
I want to start by saying I’ve been around construction all my life and I would call myself a very good all around do-it-yourselfer. Since this was for a small house and the tank water heaters were only a hundred dollars less, I thought, how could this be a bad idea? Oh, how was I wrong! First watch all the videos on these water heater!!! They are very tricky and are not like a typical tank water heater. The install/mounting was simple. The un-simple part came after we found the gas demand on this tank is very high (pay attention to this item). Basically we had to oversize all the gas pipes (1” & 3/4”). Next is the venting. Read/watch carefully how you need to vent it. We vented it through the chimney and found this was our primary issue. Our model requires or shares the exhausted air and intake air, in the same vent. You must use their vent or your kind of screwed. We got creative and used a 3” steel pipe for the exhaust but I won’t recommend this to anyone - without some great confidence and skill. I’d suggest buying a unit where the intake and exhaust are separated. Or install per the videos using their pipe. In summary, they recommend a certified Rinnai installer, which will cost you. I mean they really recommend it because they will not really help when you call them. Don’t get me wrong, you will be happy with the results, but this install is not as simple as a tank water heater…take it from me, do your homework before you think about it! ... show more
Reviewed in the United States 🇺🇸 on January 15, 2023 by BT

  • Great Unit comes without a controller.
Size: 9.8 GPM Style: Propane, Outdoor Installation Pattern Name: Heater
Once hooked up properly this system has run well for about a month. No complaint at all with the machine. But it does not come with a controller it seems. I contacted Rinnai and they confirmed. It will start without one. But if you want to easily adjust temperature or see error codes you need one at around $140. ... show more
Reviewed in the United States 🇺🇸 on March 12, 2023 by Michael Clarke

Can't find a product?

Find it on Amazon first, then paste the link below.