Search  for anything...

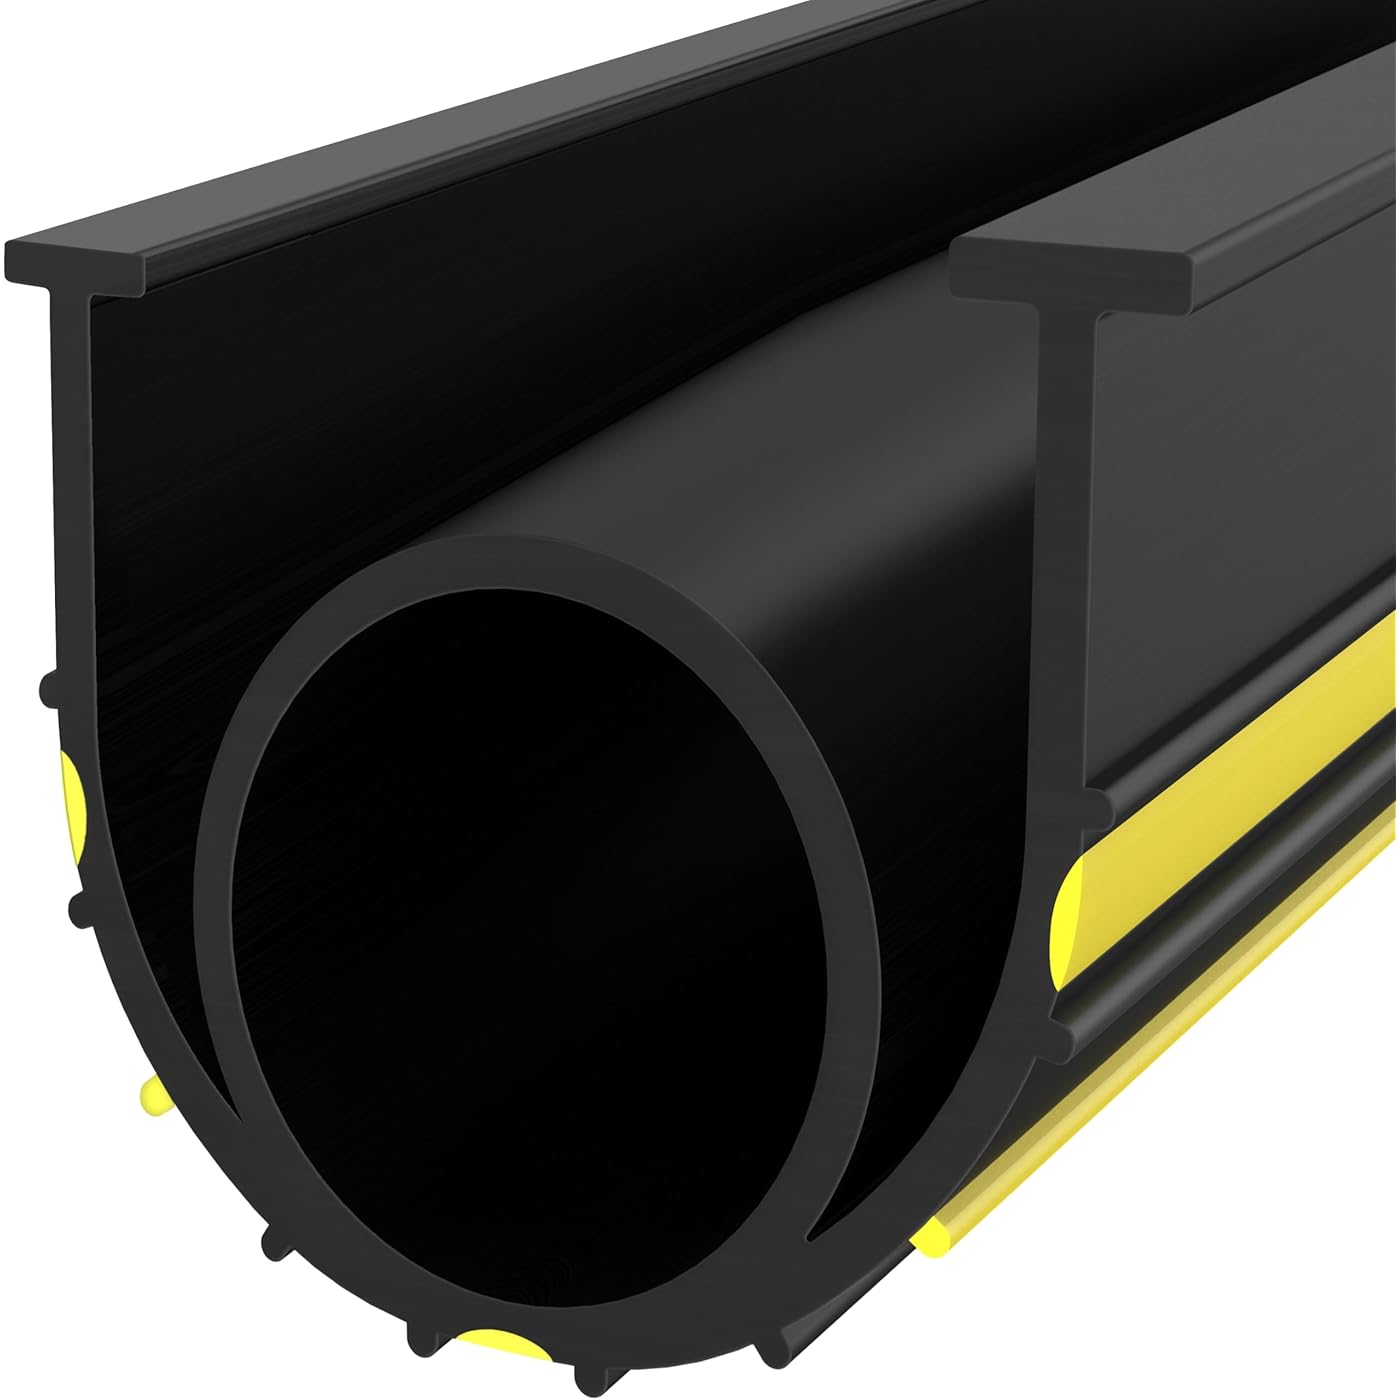
Jin&Bao Garage Door Bottom Seals with T-Ends 5/16", Premium Rubber Garage Seal Strip, Weatherproofing Garage Door Seals to Protect Your Garage(16FT, Yellow)

  • Based on 1,269 reviews
Condition: New
Checking for product changes
$19.99 Why this price?
Save $6.00 was $25.99

Buy Now, Pay Later


As low as $4 / mo
  • – 4-month term
  • – No impact on credit
  • – Instant approval decision
  • – Secure and straightforward checkout

Ready to go? Add this product to your cart and select a plan during checkout. Payment plans are offered through our trusted finance partners Klarna, PayTomorrow, Affirm, Afterpay, Apple Pay, and PayPal. No-credit-needed leasing options through Acima may also be available at checkout.

Learn more about financing & leasing here.

Selected Option

Free shipping on this product

30-day refund/replacement

To qualify for a full refund, items must be returned in their original, unused condition. If an item is returned in a used, damaged, or materially different state, you may be granted a partial refund.

To initiate a return, please visit our Returns Center.

View our full returns policy here.


Availability: Only 3 left in stock, order soon!
Fulfilled by Amazon

Arrives Tuesday, Apr 8
Order within 2 hours and 16 minutes
Available payment plans shown during checkout

Size: 16 Feet


Color: Yellow


Features

  • Great Sealing Performance: This garage door weather stripping works well in temperatures from -40F to 240F, ensuring reliable performance in different weather conditions. It also provides strong resistance against pests, insects, and other outdoor elements, making it a must-have for any garage owner.
  • Wide Compatibility: With 5/16 inch T-ends and a width of 3 3/4 inches, this door weather stripping fits most standard garage doors easily, ensuring a perfect fit and simple installation.
  • Durable and Long-Lasting: Made from high-quality, flexible rubber, this seal strip can handle extreme temperatures, heavy use, and frequent foot traffic without cracking, tearing, or losing its shape.
  • Waterproof Protection: This garage door bottom seal excels at keeping water out, keeping your garage dry and safe. When used with a Garage Door Threshold Seal, the waterproofing effect is even better, creating a reliable barrier against water and moisture, protecting your garage and belongings.
  • Easy to Install: The seal strip comes with a strong adhesive backing, allowing for quick and easy installation on any standard garage door frame in just minutes.

Brand: Jin&Bao


Material: Rubber


Color: Yellow


Product Dimensions: 192"L x 3.93"W


Item Thickness: 8 Millimeters


Brand: ‎Jin&Bao


Material: ‎Rubber


Color: ‎Yellow


Product Dimensions: ‎192"L x 3.93"W


Item Thickness: ‎8 Millimeters


Recommended Uses For Product: ‎Door


Number of Items: ‎1


Manufacturer: ‎Jin&Bao


Unit Count: ‎16 Feet


Part Number: ‎1


Item Weight: ‎6.05 pounds


Item model number: ‎1


Size: ‎16 Feet


Style: ‎Reliable


Included Components: ‎Not inculding


Batteries Included?: ‎No


Batteries Required?: ‎No


Date First Available: April 25, 2023


Frequently asked questions

If you place your order now, the estimated arrival date for this product is: Tuesday, Apr 8

Yes, absolutely! You may return this product for a full refund within 30 days of receiving it.

To initiate a return, please visit our Returns Center.

View our full returns policy here.

  • Klarna Financing
  • Affirm Pay in 4
  • Affirm Financing
  • Afterpay Financing
  • PayTomorrow Financing
  • Financing through Apple Pay
Leasing options through Acima may also be available during checkout.

Learn more about financing & leasing here.

Top Amazon Reviews


  • A Game Changer for My Garage!
Size: 10 Feet Color: Yellow
The Jin&Bao Garage Door Bottom Seals are a must-have for anyone looking to keep their garage sealed and protected. These seals fit perfectly and create a tight barrier against dust, dirt, and weather. Installation was quick and easy, and the material feels durable enough to last for years. Since adding these, my garage stays cleaner and much warmer in the winter. Highly recommend for anyone wanting to improve insulation and keep out unwanted elements! ... show more
Reviewed in the United States on December 3, 2024 by Nathan Miller

  • Quality product. Not the easiest to install.
This is a quality product. Really stout and durable. Seems like it will last for a long time. Great value. Fit my standard garage door track no problem. Had plenty left over after installing it on my standard two car garage door. Since it has the extra tube in the center, it is very firm and it doesn't compress much. So, if you have an uneven garage floor, it may not seal completely and might be better to get the version with no tube. I watch a few YouTube videos on installs because I knew it might be a PITA especially if installing it alone on a two-car garage door. About half of the YouTube videos are installs on one car garage door which is much easier and nearly all the two-car garage door installs had a helper. There was some helpful tips, but I did some stuff that may help people. I was able to install this on a two-car garage door alone without much issue. Here is some of the stuff I did to install it on a two-car garage door. Most of the YouTube videos said to use soapy water on the track before installing which is good. However, I would add that I sprayed a lot of soapy water on the weather stripping itself (on the area just before it entered the tract) while I slowly inched it through the track. I think that helped a lot. I found it best to repeatedly pull the weather stripping from the lead side a few inches than go back to the feeding side to check that it was feeding properly (making sure the weather stripping was straight), and then push it a few inches. Just doing that over and over until it was fully installed. The weather stripping has to be feeding into the track straight or it will bind, can get damaged, or it could get out of the track. It may be best to install some sort of platform ( like a temporary 2x4 ledge or some clamps) that keeps the weather stripping feeding straight into the track if doing it alone. I happened to have a 2x4 that was already there that work perfectly for that. ... show more
Reviewed in the United States on June 17, 2024 by Crash Test Dummy

  • Good Quality
Size: 16 Feet Color: Black
Bought to replace my garage seal. Was easy to install. Watch YouTube videos to get some tips. No problems with the seal so far after a year.
Reviewed in the United States on December 15, 2024 by Wheels

  • Best Product available, but has a design flaw :(
Size: 20FT Color: Yellow
This is the best garage under door weather stripping you can buy, but it has a design flaw. First off, the good. The thickness of the product is thicker than the original weather stripping that came with door. The design flaw: that the inner circle of rubber in the diagram exists, but it is not a circle, its pretty much flat. Towards the end of the roll, due to the delivery & packaging method, the inner circle is 100% crushed. On a 20 ft of stripping, after installation there is definite height difference in the expanded stripping that was on the outer part of the package roll (more expanded) than the inner part of the roll (less expanded). I was able to install 20 ft of this stripping by myself in 10 minutes in 40 degree weather. Tips on installation. 1. Make sure the track is clean. Use a paint brush to clean the top, left & right of track slides. 2. Lube the track with dish soap using a paint brush. Go over each track slide three times, changing focus per iteration to just the top, left, or right part of the track slide. 3. Test the track using a one foot piece of the old threshold and fix any related found track smoothness issues. My track was crushed, and I had a lot of difficulty pulling the old track off. My original strip was in good condition minus its perma crushed state. Upon removing the old stripping, the stripping was in much worse shape and pretty much destroyed. 3a. The garage door came assembled with two screws on the outside of the track the compressed the track in order to prevent the weather stripping from sliding. Even with the screws removed, the track would get stuck and damaged going over these spots. Fix these damaged spots using a screwdriver or putty knife. 3b. Test the start track end to verify the initial track openings are not too loose or tight. Note if it is too tight, the track cuts the strip and makes the small shavings that get embedded in the track and make pulling much harder. 4. Make a stripping feeder. On side of the track that you install the new stripping through, about an inch above the track and about 6 inches on the outside the track, place a horizontal support so that the stripping can rest on it before going into the track. Gravity will now aide in the alignment of getting the strip into the track vs fighting it. This also helps prevent the track from making shavings on the stripping. As for the reaming part of the stripping roll, I had it just fall to the ground. 5. Test install the stripping over the first 6 inches of the track as the new stripping might be slightly different dimensionally than the original track. If there is any excess looseness or tightness or shavings of the strip, fix the track issues and repeat. If one or both of the strip track ends get damaged during this process, cut the strip to remove the damaged strip end thus making a new clean feeding end. 6. Wash your hands before pulling the new strip through the track. 7. Do NOT use any tools to help push/pull the stripping, this will damage the strip and/or cause additional pulling friction. 8. Pull the strip through the track by placing your thumb in the defective inner circle. Push the strip up towards the sky and then pull the track not via your arms but by leaning your body in the direction of pull instead. After every big strip movement, check the starting installation point for any strip shavings or dislodgement. If there is allot of shavings or dislodgement, remove all the stripping, fix the issue, clean, relube, and repeat. When the pulls in step 8 starst to feel harder, move on to step 9. I was able to quickly pull the strip through 15 ft of the 20 ft of track in under two minutes using this process. 9. The last mile, it’s not hard, but it is tedious. The last 5 feet of strip installaton took me 8 minutes. 9a. Make one pull on the stripping at the farther part of installation using the same technique as described in step 8. The stripping at this point will not only move but also stretch. Thus, when you stop pulling the strip will contract some. This pull is primarily now uncompressing and expanding the stripping that is already installed in the track. 9b. Go the starting installation point and check for shavings and remove. Apply more soap on the track ends on the feeding side if needed. Do not over apply as you do not want soap on the sides of the strip. 9c. Move a couple of feet down from the feeding installation point and pull the track using the same techniques used in step 8, but gripping the track with both hands on the sides of the track. This pull is now the main pull that is feeding new stripping into the track. This pull does not travel much and is limited to the distance of the how much the installed track can be pushed and compressed. Now repeat step 9a through 9c as main times as needed. Each iteration of step 9 moved the stripping down the track around a ½ of inch. Possible inner circle defect fixes. 1. Preexpand the stripping by exposing the stripping in hot water. This might not do anything if the product was made with the inner tube initial being flat to start out with. However, if the inner circle tube was actually formed as a circle, then the heat should make the product revert back to its initial shape. I did this on my old track, and it became less crushed. 2. Place clamps on installed stripping at the bottom to compress strip sides and expand the internal inner circle tube. Probably works best in summer installation vs winter installations. 3. Inject additional foam into the inner circle such that it expands and resists crushing. 4. Seal both ends of the inner circle stripping and then fill with compressed air. I was able to do this using pieces of pool noodles, but then pool noodles would blow out under pressure. I attempted the inner circle fix number #3 above, However I messed up and placed cut up pool noodle pieces above the inner circle and not in it. I notice my mistake about a foot in and then tried to feed pool noodle bits into the inner tube on the other side, but it was much more difficult, thus i continued with the noddle above the inner tube for the entire length of the stripping. Note that first foam inserted into the stripping need to make its way to the center of the tube. As more foam is inserted the foam will crush and expand the stripping in width. Thus the foam install fills the middle of the stripping first and then fill toward on end stripping until it can no long be filled on that side. The process then repeats on the other side. The loading process is kind of cival war gun loading with a ram rod. My rod for this was a 10ft piece of 1/2 pex pipe that i would lube with tiki torch oil every other ram rod. This entire process took a little over an hour, using 2 pool noodles. The best pool noodle size for easy pushing to cut the noodle into 1/8 diameter sections with a length of 6 inches. As you continue to ram rod foam into the stripping, check for gaps in the foam in the stripping. You really cannot fix the gaps latter on, so check for them often and correct if found. Another tip is to using pex pipe as a spring to assist in the pushing of the foam. I positioned the pex against the wall in a half circle with the circle's verticle mid point at the height of were the noodle was being feed into. Pulling down on the pex pipe from the top of circle made the internal pex spring convert the applied vertial force and into a horizonal force. The wall has more resistance than the pool noodle, thus pool gets pushed further down the strip Push uppward on pex pipe to recreate the half circle when the pex tube circle flattens out and then repeat the process until the noodle can not be moved any more.. ... show more
Reviewed in the United States on November 24, 2023 by thekingofspain

  • Not an easy install because of the door, the seal is great
Size: 16 Feet Color: Yellow
Our 15' garage door (over 15 years old) needed a new seal and this one fits, does the job. The hardest part was the install. In our case, it turned out to be impossible to slide on the seal to the door strip as then re attaching the aluminum strip means you have to put screw holes in your seal. We ended up taking the entire lower panel off the door to get to the area in a way we could get the seal on. Multi day project for us. Not the fault of the product at all. The seal itself comes opened up 'flat' and round wound. Tip: lay it out on the garage floor for a couple days to let it relax some. Seal was super sturdy and thick, we measured the T slot accurately, so we got the correct size. Nice product. ... show more
Reviewed in the United States on November 2, 2023 by Kim Wendt

  • Work well.
I am happy with this product , easy to install, and feet my garage doors pretty well.
Reviewed in the United States on November 8, 2024 by Vlad

  • Fast & easy replacement garage door seal!
Size: 20FT Color: Yellow
High quality. Value priced. Good directions. Fast delivery.
Reviewed in the United States on October 12, 2024 by I'm the dad 563

  • Heavy duty 18 foot door seal
Size: 16 Feet Color: Yellow
Nice substantial well sealing garage door seal replacement. Supposed to be inflated with air to maintain a seal, but the two sealing plugs fall out immediately. Tried to silicone them in. Popped out as soon as pressure increased in door seal. Still would recommend but might leak at the corners with no plugs. Captain Red ... show more
Reviewed in the United States on December 11, 2024 by Jeri

Can't find a product?

Find it on Amazon first, then paste the link below.