Search  for anything...

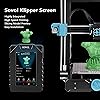
Sovol 5" IPS Touch Screen with Klipper Firmware Pre-Installed for Sovol SV06 Plus 3D Printer, Assist SV06 Plus Speed up to 350mm/s

  • Based on 55 reviews
Condition: New
Checking for product changes
$99.99 Why this price?
Save $269.01 was $369.00

Buy Now, Pay Later


As low as $16.67 / mo
  • – 6-month term
  • – No impact on credit
  • – Instant approval decision
  • – Secure and straightforward checkout

Ready to go? Add this product to your cart and select a plan during checkout. Payment plans are offered through our trusted finance partners Klarna, PayTomorrow, Affirm, Afterpay, Apple Pay, and PayPal. No-credit-needed leasing options through Acima may also be available at checkout.

Learn more about financing & leasing here.

Free shipping on this product

30-day refund/replacement

To qualify for a full refund, items must be returned in their original, unused condition. If an item is returned in a used, damaged, or materially different state, you may be granted a partial refund.

To initiate a return, please visit our Returns Center.

View our full returns policy here.


Availability: 11 left in stock
Fulfilled by Amazon

Arrives Monday, Nov 25
Order within 18 hours and 38 minutes
Available payment plans shown during checkout

Features

  • Pre-installed Klipper firmware makes SV06 Plus print at 350mm/s, 2 times as before. Print quality can be kept while speeding up.
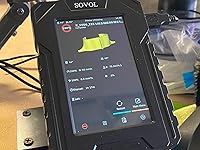
  • 5 inch IPS capatitive touch screen with a resolution of 480x800 provides high definition and rich colors. The Klipper touchscreen has great function options like height map, input shaper and slicing prints preview. It is customizable to suit your other printing needs. Multiple languages are also supported on this touch screen.
  • Clip Design makes installation easier.
  • Only fits for Sovol SV06 Plus. We do not recommend you to install it for Sovol SV06. You can order the specific Klipper screen for Sovol SV06.
  • Any questions about the product please let us know at any time.

Brand: Sovol


Material: /


Color: Black


Product Dimensions: 0.85"D x 3.5"W x 5.4"H


Item Weight: 237.4 Grams


Product Dimensions: 11.42 x 7.48 x 3.35 inches


Item Weight: 8.4 ounces


Item model number: SV06 Plus


Date First Available: October 19, 2023


Manufacturer: Sovol


Country of Origin: China


Frequently asked questions

If you place your order now, the estimated arrival date for this product is: Monday, Nov 25

Yes, absolutely! You may return this product for a full refund within 30 days of receiving it.

To initiate a return, please visit our Returns Center.

View our full returns policy here.

  • Klarna Financing
  • Affirm Pay in 4
  • Affirm Financing
  • Afterpay Financing
  • PayTomorrow Financing
  • Financing through Apple Pay
Leasing options through Acima may also be available during checkout.

Learn more about financing & leasing here.

Top Amazon Reviews


  • Works Great and Super Easy to setup!
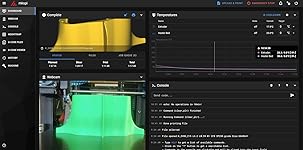
The media could not be loaded. Typically, I do not want to change anything that works well, but after getting the SV07+ and using a Klipper system I was hooked. I am very patient with my prints, I do not mind waiting a little longer for the best quality print. That I why I ended up with 6 different Sovol 3D printers, so I can start one something else while I am printing with another. Long story short, the Klipper firmware has totally changed my perspective and quality verse speed, now you can get both. I was worried about the setup process, especially dealing with installing a new firmware and slicer software. But, this process is super easy. Some people might get worried about the wiring, especially the part with the power supply. But it is pretty simple, Red wire is positive (+) and black wire is negative (-). Match up to wires up to the open screws and attach it tightly. Since you have everything opened up, I would suggest snugging up the other few screws that are being used already because a few of mine was NOT very tight. Do not over tighten it or you can strip the screws too. Since I was limited on space with my printer setup, I mount the Klipper screen somewhere else. So, I had to extend the power wire a little longer. The only other addition I made was adding a web camera and that was super easy too. I just plugged the camera in an open USB port on the Klipper screen and added a camera in the settings menu, then it worked. In the past, I used a Raspberry Pi to monitor and control all my printers. The setup for the Pi is not difficult but takes a bit more work to do. But that was not the problem, the real issue was getting your hands on a Raspberry Pi at a reasonable price. For some reason, it was always sold out everywhere and if you did find one it would cost you about $100 if not more. But now, you can get the same thing, plus a 5-inch touch screen for less money. Not only is the installation process is very easy, but your print time will be reduced and the quality will be just as good if not better. If you do not like following directions in a manual, there are a lot of YouTube videos you can watch to learn how to setup the Klipper screen for your machine. Unless you know what you are doing, the Sovol customized Cura slicing software is a good starting point, because it includes all the info needed for the Klipper system (print speed, Start & End gcode, and etc). I am also happy to report that the Web Cam installation was very easy to install too. Once you get your Klipper screen connected with your WiFi network, you can access the Klipper UI on your computer by typing in the IP address. Then go to “setup” (gear icon on the top right), in the popup window, scroll down and click on “webcams.” Click on “add webcam” and enter a name, then click on “save webcam.” You can leave all the other setting as default. Make sure you restart the Klipper screen (shutdown and restart. Not just pull the plug) and the webcam should work now. My final thoughts about this kit is pretty much all positive, so I do not have any pros and cons about it: • Good quality prints at faster print speeds • Easy gcode uploads • Remote monitoring (only local network, unless you use 3rd party app or port forwarding with your router). • Cheaper and easier than running using a Raspberry Pi. ... show more
Reviewed in the United States on January 10, 2024 by WRONG17 WRONG17

  • Setup was easy, but it seems that it can actually destroy your printer.
Update: After resetting things to default I was able to get everything back working again. while getting it set back up and running the resonance tests it seems that the vibrations on the Y axis may have been a bit too much for it, the plastic part the belt attaches to snapped. I've had printers fail in the past but this is a new one, might just be time to call it on trying to get this thing to work. ------------------------------------------------------------------------------- I've used this for about a week, and after getting it set up I will say the mesh bed leveling is a massive improvement over the standard SV06, I've had much better luck getting prints to stick and finish successfully than I did before. The main issue I've had since installing it is that many of my prints will have layer shift at some random point, when this happens the layer shift generally continues for 20 layers or so, then the print proceeds as normal, just offset about 2mm on either the x or y axis. In spite of this It was able to complete about 50% of the prints I sent to it. In the past day or so it has begin having issues where klipper will repeatedly crash when trying to load any STL file to print, I'm not sure if this is a unique problem, but a week seems a bit short for the longevity of a product. So I guess my summary is that this would be an amazing upgrade for $100 if it were more reliable, but as is I can't really recommend it, or say I'd buy it again. ... show more
Reviewed in the United States on December 7, 2023 by Jonathan

  • Great upgrade, but can be better
I never planned to Klipperize my SV06, I printed mostly TPU and felt that since I'm pushing the maximum flow the extruder can output (any faster and TPU will start jamming), I won't benefit from the faster speed. Hoo boy was I wrong, I'm seeing 20-25% shorter print time AT THE SAME SPEED AS BEFORE thanks to Klipper sharp movements & acceleration. Being able to organize & control my printer on my PC is a big quality of life increase. However, enough about Klipper, let's talk about the upgrade kit itself. Tips: Since you'll have to open up the PSU, I recommend printing & installing the PSU Fan Silencer while you're at it (STL is available online) Installation was pretty easy, though the manual can use some revision, I got confused here and there but eventually worked it out. The installation steps are as below: 1. Remove your original display & put on the new Klipper screen. 2. Remove your power supply & open it up, install power wire into V+ & V- area (red to V+, black to V-). I got confused at this step because the manual pictures show to install the wire into slots that already have wires installed. Then I realized slot 1-3 is V+ and 4-6 is V-. 3. Connect all necessary wiring to the Klipper screen. 4. Copy the firmware .bin on the provided USB to your printer's microSD card. 5. Insert your microSD card in your printer, turn on and give it a minute for flashing. 6. Your SV06 is Klipperized, follow the manual for calibration & input shaping. Know that if you used vanilla Cura, you'll have to edit your Start & End Gcode. I copy pasted from Sovol Slicer into vanilla Cura and it worked fine from there. This kit utilize a MKS Pi board, which is pretty reliable and have plenty of power to power one printer. The web UI is clean and not reskinned, which is welcoming. I have put about 48 hours of print time on my SV06 after upgrading and have had bug or ran into any issue. The Klipper screen have a spare USB port that can be used for a camera/webcam also, I will grab one later on. Now, the best thing aside from web UI, is that stepper motor noise are now virtually silent. Originally, the stepper noise isn't that bad, but the high pitch sound were very distinct and can be heard a room away. Now, the only thing I can hear are true white noises, only bearing movements & fan noise. My SV06 is in my office and now I sometime even forgot it is running. The good: - All the Klipper goodness (faster print time, web interface, ability to add a camera) - Pretty easy install, it took me about 10 minutes to set up, and 15 minutes to calibrate. The bad: - $100 for only one printer is pretty steep. - The Z Tilt (X Gantry leveling) is not effective, you will have to do the Soup Can method to level your X gantry. - Manual can be a little bit clearer Also, I recommend upgrading the bearings on X & Y Gantry to better ones (I used IKO LM8UU bearings), the stock bearings are quite noisy even when lubricated. So would I recommend this? I would say yes if you're like me and is a little intimidated with the normal Klipper process. This kit will allow you to skip the technical part and get right into calibrating & printing. ... show more
Reviewed in the United States on November 20, 2023 by Tim Ng Tim Ng

  • Makes your existing printer go fast and easier to use, but filament sensor no longer works.
Size: SV06 Plus
This is my first time using Klipper. I was really impressed how it made my printer go nuts, and I don't have to keep using the micro SD card to print stuff. However, this upgrade does make your filament sensor useless......
Reviewed in the United States on May 29, 2024 by George

Can't find a product?

Find it on Amazon first, then paste the link below.